How to install chain link fence gate?
 Chain Link Fence Installation Manual
[ 1 ] [ 2 ] [ 3 ] [ 4 ] [ 5 ] [ 6 ] [ 7 ] [ 8 ] [ 9 ]
Install Gates:
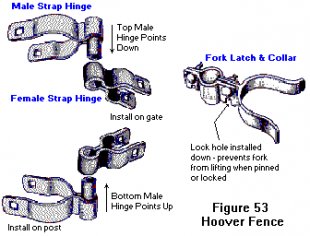
- There are many different types of hinges and latches on the market today for use with chain link gates. Most are self-explanatory and do not include a set of installation instructions. Installation instructions usually accompany the more complicated hinges and latches. For the most basic of hardware:
- Install female hinges on gates using nuts and bolts. Again, nuts should be installed on the inside of the enclosure. Space them the maximum distance apart as possible.
- Hold gate in opening and mark the location of male hinges. Point the male hinge on the bottom up and the one on top down.
- Install bottom and top male hinge with bolts. Tighten bottom hinge snug, but leave top hinge loose.
- Place gate on bottom hinge and lower top male hinge into female hinge.
- If the space under the gate is acceptable. Tighten top male hinge snug.
- Test swing the gate to see if it will miss the ground. Adjust as needed.
- Tighten all hinge bolts. Do not over tighten.
- Install the latch at a convenient height (nuts inside).
- In the case of a double swing gate, install the gate closest to the ground first, unless the ground is perfectly level. Hang second gate level to the first. Although you may 'step' the gates for a tight fit to the ground, it looks best to install them level to one another.
- Install double gate drop rod/latch assembly.
- Install center stop for double swing gate. Close the double gate, making certain the two leaves are lined up (straight w/ fence line). Mark the ground where the center stop needs to be installed. You may simply use a cut-off piece of pipe as a center stop by driving it into the ground. Proceed slowly, checking the gate to make certain you are driving the pipe straight. You may also use a prefabricated center stop and cement it for a better appearance. If the center stop is in a concrete drive, simply drill a hole in the concrete larger than the drop rod diameter. Be sure to drill clear through the concrete drive to allow water to drain. Always make a much larger hole (or pipe size) than the diameter of the drop rod to allow for gate sag, posts shifting, ice and other factors.
- Install gate holdbacks if desired. Open gate(s) to the desired 'open' position. Cement or drive a 2" O.D. post a couple inches beyond this point. Install holdback at correct height using U-bolts provided.
- Install all post caps.
(Click for Product Details)
Source: www.hooverfence.com


